Rolling a project forward creates a new project for next year based on the selections in the current year project. The roll forward rules used for a project are set in the project's template. Projects can be rolled forward individually or in batches.
Projects that are rolled forward create new projects for the following year, not necessarily the next period. This is true even for projects that occur several times in a single year.
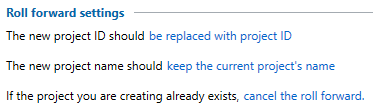
At minimum, you must specify the following when you roll forward a project:
The project ID is created for the new project
The project name is created for the new project
Duplicate projects are handled.
You can also review and edit other roll forward rules for the new project, but this is optional. The parameters you can change display in blue text. Click the blue text to make a different select. Show me an example.
You can prevent a project from rolling forward by selecting the Do not roll forward check box in the project's profile. Projects with a one-time only frequency will not roll forward either. There are other situations when projects that otherwise would roll forward might not do so. If a project meets one of these conditions and is part of a batch being rolled forward, it is skipped during the batch roll forward process.
Roll Forward Methods
There are two main roll forward methods: manual and automatic. The method that can be used for a project is set in the roll forward rules in the template.
A manual roll forward allows you to roll forward a project without going through a roll forward approver.
With an automatic roll forward, a project that meets the roll forward condition is automatically added to the Roll Forward Approvers view. This view allows the person charged with rolling forward projects to see at a glance which projects are ready for roll over. If needed, the approver can decline roll forward for some projects and complete the roll forward for others.
Roll Forward Manually
You can roll a single project forward by itself, or you can roll multiple projects at one time. Click a link below to view detailed instructions for each method.
In a Workstream Projects view, select the project and click Roll Forward in the Administrative group on the Manage tab. You can also right-click and select Roll Forward from the menu.
Select options for the first two items to specify how the new project's ID and name are calculated.
If be replaced with project ID/name is selected, enter the ID/name that the new project should use.
If append to current project ID/name is selected, enter the value that will be appended to the existing project ID/name.
If replace the beginning of the current project’s ID/name is selected, enter the value that will replace the beginning characters of the current project’s ID/name.
If replace the ending of the current project’s ID/name is selected, enter the value that will replace the ending characters of the current project’s ID/name.
Select the action to be taken if the project already exists in the next period.
Review and, if applicable, update the remaining roll forward rules, including the method to create the next project. The next project is the project created from the current roll forward process.
When you roll forward multiple projects at one time, you can either review the roll forward settings for each project or roll forward the projects without reviewing these settings.
Review Settings Before Rolling Forward
In a Workstream Projects view, select multiple projects and click Roll Forward in the Administrative group on the Manage tab. You can also right-click and select Roll Forward from the menu.
Click Review.
For each project selected, do the following:
Select options for the first two items to specify how the new project's ID and name are calculated.
If be replaced with project ID/name is selected, enter the ID/name that the new project should use.
If append to current project ID/name is selected, enter the value that will be appended to the existing project ID/name.
If replace the beginning of the current project’s ID/name is selected, enter the value that will replace the beginning characters of the current project’s ID/name.
If replace the ending of the current project’s ID/name is selected, enter the value that will replace the ending characters of the current project’s ID/name.
Select the action to be taken if the project already exists in the next period.
Review and, if applicable, update any of the remaining roll forward rules, including the method to create the next project. The next project is the project created from the current roll forward process.
Click Next to proceed to the next project in the series.
Continue reviewing and selecting the roll forward settings for each project.
On the last window, click Roll Forward to start the roll forward process.
Roll Forward Without Reviewing Settings
In a Workstream view, select multiple projects and click Roll Forward in the Administrative group on the Manage tab or right-click and select Roll Forward from the menu to display the Roll Forward window.
Click Roll Forward.
Select options for the first two items to specify how the new project's ID and name are calculated.
If be replaced with project ID/name is selected, enter the ID/name that the new project should use.
If append to current project ID/name is selected, enter the value that will be appended to the existing project ID/name.
If replace the beginning of the current project’s ID/name is selected, enter the value that will replace the beginning characters of the current project’s ID/name.
If replace the ending of the current project’s ID/name is selected, enter the value that will replace the ending characters of the current project’s ID/name.
Select the action to be taken if the project already exists in the next period.
Click Roll Forward.
Roll Forward Automatically
When the automatic roll forward method is selected on the Roll Forward Rules window, the project can be set to roll forward at the following times:
When a project is completed
When a linked work object is rolled (for example, a linked CCH Axcess™ Tax return)
Projects that are set to automatically roll forward require approval by the staff, role, or team set as the approver in the project's roll forward rules. The approver receives a notification or email containing a hyperlink to the Roll Forward Approver window, listing the projects that are ready to be rolled forward. If only some of the projects are ready to be rolled forward, those projects will be selected in the list.
Click the hyperlink on the notification or email to display the Roll Forward Approver view. You can also just open the Roll Forward Approver view in Workstream.
Select the project you want to roll forward to the next period and click Approve Roll Forward in the Administrative group on the Manage tab. You can also right-click and select Approve Roll Forward from the menu.
Select options for the first two items to specify how the new project's ID and name are calculated.
If be replaced with project ID/name is selected, enter the ID/name that the new project should use.
If append to current project ID/name is selected, enter the value that will be appended to the existing project ID/name.
If replace the beginning of the current project’s ID/name is selected, enter the value that will replace the beginning characters of the current project’s ID/name.
If replace the ending of the current project’s ID/name is selected, enter the value that will replace the ending characters of the current project’s ID/name.
Select the action to be taken if the project already exists in the next period.
Review and, if applicable, update any of the remaining roll forward rules, including the method to create the next project. The next project is the project created from the current roll forward process.
Click the hyperlink on the notification or email to display the Roll Forward Approver view. You can also just open the Roll Forward Approver view in Workstream.
Select the projects you want to roll forward to the next period and click Approve Roll Forward in the Administrative group on the Manage tab. You can also right-click and select Approve Roll Forward from the menu.
Click Review.
For each project selected, do the following:
Select options for the first two items to specify how the new project's ID and name are calculated.
If be replaced with project ID/name is selected, enter the ID/name that the new project should use.
If append to current project ID/name is selected, enter the value that will be appended to the existing project ID/name.
If replace the beginning of the current project’s ID/name is selected, enter the value that will replace the beginning characters of the current project’s ID/name.
If replace the ending of the current project’s ID/name is selected, enter the value that will replace the ending characters of the current project’s ID/name.
Select the action to be taken if the project already exists in the next period.
Review and, if applicable, update any of the remaining roll forward rules, including the method to create the next project. The next project is the project created from the current roll forward process.
Click Next to proceed to the next project in the series.
Continue reviewing and selecting the roll forward settings for each project.
On the last window, click Roll Forward to start the roll forward process.
Roll Forward Without Reviewing Settings
Click the hyperlink on the notification or email to display the Roll Forward Approver view. You can also just open the Roll Forward Approver view in Workstream.
Select the projects you want to roll forward to the next period and click Approve Roll Forward in the Administrative group on the Manage tab. You can also right-click and select Approve Roll Forward from the menu.
Click Roll Forward.
Select options for the first two items to specify how the new project's ID and name are calculated.
If be replaced with project ID/name is selected, enter the ID/name that the new project should use.
If append to current project ID/name is selected, enter the value that will be appended to the existing project ID/name.
If replace the beginning of the current project’s ID/name is selected, enter the value that will replace the beginning characters of the current project’s ID/name.
If replace the ending of the current project’s ID/name is selected, enter the value that will replace the ending characters of the current project’s ID/name.
Select the action to be taken if the project already exists in the next period.
Click Roll Forward.
Declining Roll Forward
When you are in the Roll Forward Approver view, you can decline to roll forward a project. When you do so, the project is no longer listed in the Roll Forward Approver view. The project can be rolled forward at a later time using a manual roll forward.
To decline the roll forward of a project, do the following:
In Workstream, open the Roll Forward Approver view.
Select the project you want to decline to roll forward.
Click Decline Roll forward in the Administrative group on the Manage ribbon, or right-click and select Decline Roll Forward from the menu.
Exception Report
If projects cannot be rolled forward, an Exception Report displays at the end of the roll forward process. The report lists all the projects that were not rolled forward with an explanation for each exception.